


Want to find out how KUNBA packaging machines can benefit you? Contact and consult our team of experts to find out about packaging solutions tailored to your needs!
Stop Vacuum Leaks on Chamber Sealer – Permanent Fix | KUNBA
Jun 10,2026
You run a vacuum cycle. The gauge climbs, the pump hums, and then—the pressure drops. The bag comes out with air still inside. Or worse: it seals perfectly, but an hour later, the package has reinflated. You’ve adjusted the settings. You’ve tried different bags. Nothing changes.
A chamber vacuum sealer that won’t hold vacuum is one of the most frustrating equipment failures in any packaging operation. But here’s the good news: most vacuum leaks are caused by a small handful of components, and each can be diagnosed and permanently fixed without replacing the entire machine.
This guide walks through a systematic approach to finding and fixing vacuum leaks—for good.
How to Diagnose a Vacuum Leak
Before you can fix a leak, you need to know where it is. Guessing and replacing parts randomly is expensive and rarely solves the problem.
Run a vacuum-hold test
The most reliable diagnostic method is a vacuum-hold test. Place a known-good bag—or run an empty chamber cycle—and observe the pressure gauge.
-
Set a standard vacuum time.
-
Close the lid and start the cycle.
-
Once the pump stops, turn off the pump and observe the pressure gauge for a fixed interval—typically 5 minutes.
-
Fast pressure rise indicates a leak in the system.
Narrow down the source
Once you’ve confirmed a leak exists, systematically test each potential source:
-
Lid gasket: The most common failure point. Listen for hissing around the lid seal during operation.
-
Seal bar and chamber area: Check for debris or damage on the sealing strip and foam gasket beneath the lid.
-
Vacuum hoses and fittings: Leaks can occur in hoses underneath the chamber or at connection points.
-
Vacuum pump and valves: Pump wear, contaminated oil, or faulty intake valves can cause pressure loss.
Use a leak detection spray
For hard-to-find leaks, apply a bubble test solution around the lid seal, hose connections, and fittings while the machine is under vacuum. Bubbles will form at the leak point.
The Most Common Leak Points – And How to Permanently Fix Each
Lid Gasket – The First Culprit
The lid gasket is the component that seals the chamber during the vacuum cycle. Over time, it degrades due to the draw of the vacuum and continuous time under pressure. You may notice visual signs—shredding, deformation, or compression—but the real indicator is performance: pouches no longer have all the air removed even though your settings haven’t changed.
Permanent fix: Replace the gasket.
Step-by-step replacement:
-
Turn off and unplug the machine. Ensure it is completely cool.
-
Remove the old gasket by pulling it from one corner—the entire thing will pull right out.
-
Inspect the channel for debris or damage before installing the new gasket.
-
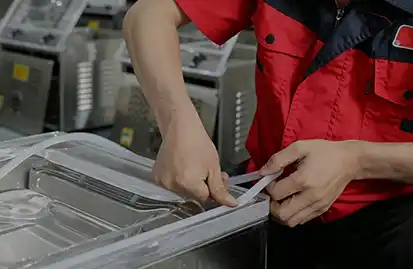
Install the new gasket: Find a center point in the back edge of the channel. Take one end of the gasket and lay the flat bottom into the channel. Important: Do not overstretch the gasket during installation—doing so may cause it to lay too thin in the channel, preventing full engagement against the lid.
-
Compress the corners first: Push the gasket into each corner channel, then work the long edges in.
-
Trim if necessary: If the gasket is slightly too long, cut the excess with scissors, leaving an extra 1/32 or 1/64 of an inch.
-
Test: Close the lid and run a full vacuum and seal cycle.
For models with seamless gaskets, installation is similar—the ends should simply fit snugly together.
Seal Bar and Seal Area – Debris and Wear
Debris on the sealing strip or foam gasket beneath the lid is a surprisingly common cause of vacuum loss. Crumbs, grease, or liquid residue can prevent the lid from sealing fully against the chamber.
Permanent fix: Clean the seal area thoroughly and replace worn components.
-
Wipe the sealing strip and gasket with a clean, damp cloth and mild detergent.
-
For stubborn residue, use isopropyl alcohol on a lint-free cloth.
-
Inspect the Teflon tape on the sealing bar. If it appears burned, darkened, wrinkled, or torn, replace it.
-
Check the sealing bar itself for kinks or damage.
Pro tip: Make cleaning the seal area part of your daily routine—it prevents residue from hardening and becoming difficult to remove.
Vacuum Hoses and Fittings – Hidden Leaks
Leaks in vacuum hoses or fittings are harder to spot but equally destructive. A loose connection, a cracked hose, or a clogged line can all cause pressure loss.
Permanent fix: Inspect and replace damaged components.
-
Check all visible hoses underneath the chamber for cracks, kinks, or loose connections.
-
Use the bubble test method around hose fittings to identify leaks.
-
Replace any damaged hoses or fittings with manufacturer-specified parts.
-
Check the vacuum sensor line—a clogged or leaking line here can give false pressure readings.
Vacuum Pump – Performance and Oil Maintenance
The vacuum pump is the heart of your chamber sealer. If it’s underperforming, the machine simply can’t achieve or hold the required vacuum level.
Permanent fix: Maintain the pump oil and replace worn components.
-
Check oil level weekly through the inspection window.
-
Change oil regularly: First oil change after 1 week of use; subsequent changes every 3 months or 250 cycles.
-
Watch for oil contamination: Water mixing with vacuum oil creates a milky emulsion that destroys lubrication and sealing performance. Cloudy or milky pump oil is a primary diagnostic indicator of contamination.
-
Clean or replace the exhaust filter every 6–12 months.
-
Run a cleanup cycle periodically: Some machines offer a program that brings the pump to maximum operating temperature, boiling off accumulated moisture.
Note: If the pump itself is worn—indicated by persistent failure to achieve vacuum even after oil changes—professional service or pump replacement may be required.
The Permanent Fix Framework – A Complete Checklist
| Component | Inspection Frequency | Permanent Fix |
|---|---|---|
| Lid gasket | Monthly—visual check for wear | Replace when shredded, compressed, or no longer springing back |
| Seal bar / Teflon tape | Weekly—check for debris and burns | Clean daily; replace tape when burned or wrinkled |
| Seal area / chamber | After each use | Wipe clean with mild detergent |
| Vacuum hoses | Quarterly—check for cracks/loose connections | Replace damaged hoses; tighten fittings |
| Vacuum pump oil | Weekly—check level and clarity | Change every 3 months or 250 cycles |
| Exhaust filter | Every 6–12 months | Replace when dirty |
When building a comprehensive maintenance routine that prevents leaks before they start, exploring proper care procedures for your specific machine configuration is essential.
When to Call a Professional
Not every leak can be fixed with a gasket replacement or an oil change. Consider professional service when:
-
The vacuum pump fails to achieve vacuum even after oil changes and filter cleaning
-
You hear grinding or unusual noises from the pump area
-
The machine displays persistent error codes related to pressure or vacuum sensors
-
You’ve replaced the gasket and checked all hoses, but the leak persists
In these cases, the issue may be internal—worn rotary vanes, a failed vacuum sensor, or a leaking solenoid valve. These repairs typically require trained technicians.
Building a Leak-Proof Maintenance Routine

The best way to stop vacuum leaks permanently is to prevent them from developing in the first place. Here’s a practical routine:
After each use:
-
Wipe the chamber interior, sealing bar, and gasket
-
Remove visible debris and food residue
-
Dry all surfaces to prevent rust and residue buildup
Weekly:
-
Inspect gaskets for cracks or compression
-
Check oil level through the inspection window
-
Wipe the seal area clean
Monthly:
-
Run a vacuum-hold test to catch developing leaks early
-
Inspect hoses and fittings for wear
-
Deep-clean the chamber
Quarterly:
-
Replace Teflon tape if needed
-
Check the exhaust filter
-
Perform a full system inspection
By following this routine, you’ll catch small issues before they become costly failures—and you’ll never have to wonder why your chamber sealer won’t hold vacuum again.
For a deeper understanding of matching your maintenance approach to different machine types and production volumes, KUNBA’s maintenance resources provide detailed guidance for various equipment configurations.
Next Steps: From Repair to Long-Term Reliability
A vacuum leak on a chamber sealer is rarely a mystery. In most cases, the culprit is one of four components: the lid gasket, the seal area, a vacuum hose, or the pump oil. By following a systematic diagnostic process—starting with a vacuum-hold test and working through each potential source—you can identify the leak and apply a permanent fix without guesswork or unnecessary parts replacement.
Once you’ve resolved the immediate issue, the next logical step is establishing a maintenance schedule that prevents future leaks. For operations running multiple machines or higher production volumes, understanding the specific maintenance requirements of different equipment configurations helps ensure long-term reliability. You can explore KUNBA’s range of vacuum packaging solutions to find models designed for easy maintenance and extended service life.
For ongoing education, consider reading KUNBA’s guide on how often to clean a chamber vacuum sealer, which includes detailed daily and weekly maintenance routines that complement the leak-prevention strategies covered here.
Related Reading
-
How Often to Clean a Chamber Vacuum Sealer
-
How to Set Up a Double Chamber Vacuum Packing Machine
-
Automatic vs. Manual Vacuum Packing Machine: Selection Guide
-
Double Output: Upgrading to a Fully Automatic Vacuum Packing Machine
This article is part of KUNBA’s technical content library. No direct sales or pricing information is included. All technical discussions aim to help you make informed purchasing decisions.
Latest events