


Want to find out how KUNBA packaging machines can benefit you? Contact and consult our team of experts to find out about packaging solutions tailored to your needs!
Selecting the right equipment for removing air from a package often starts with one confusing number: vacuum degree. You see terms like “-99 kPa”, “absolute pressure 1 mbar”, or “Turbo mode”. But what do these numbers actually mean for your product quality, cycle time, and energy cost?
Many buyers jump to the highest possible vacuum level, assuming deeper equals better. In reality, over-specifying this parameter can increase machine cost, slow down production, and even damage delicate items. Understanding how vacuum depth works – and how to match it with your specific application – is the key to making a confident investment.
1. The Physics in Simple Terms – What “Vacuum Degree” Really Tells You
Vacuum degree describes how much air has been removed from a sealed compartment. It is usually expressed in two ways:
-
Absolute pressure (mbar, Pa, Torr): The remaining pressure inside the chamber. Lower absolute pressure = deeper vacuum.
-
Relative pressure (negative kPa, inHg): The difference between ambient atmospheric pressure and the internal pressure. For example, -90 kPa means only 10 kPa of air remains.
In food and industrial packaging, the goal is to lower residual oxygen (O₂) because oxygen causes oxidation, mould growth, and loss of flavour. A deeper vacuum reduces O₂, but not linearly: dropping from 100 mbar to 10 mbar removes 90% of O₂, while dropping from 10 mbar to 1 mbar only removes an additional 9% – yet requires significantly longer pump run time and stronger sealing bars.
2. Why the “Perfect” Vacuum Degree Doesn’t Exist for Every Product
Industry standards like ISO 21358-1 remind us that the required vacuum level depends on the product’s porosity, liquid content, and packaging film tolerance. Here are three real‑world scenarios:
| Product Type | Recommended Vacuum Level (abs.) | Risk of Over‑Vacuuming |
|---|---|---|
| Dry solid (rice, nuts, coffee beans) | 20–50 mbar | Minimal – but cycle time increases |
| Moist or oily food (fresh meat, cheese, fish) | 1–5 mbar | Liquid can be sucked into the vacuum pump or the seal area |
| Powder or sharp-edge items (spices, granulates, metal parts) | 50–100 mbar | Fine dust may migrate into the valve system; high vacuum causes implosion damage. |
For instance, a flexible vacuum bag with oxygen absorbers works well at 50 mbar, while a hard plastic container for long‑term food storage might require below 5 mbar. Always consider the product’s physical behaviour before chasing the lowest possible number.
3. A Step‑by‑Step Tutorial to Match Vacuum Degree with Your Packing Machine
Instead of memorising technical formulas, follow this four‑step selection process. It will help you shortlist the right configuration without overpaying for unnecessary ultra‑high vacuum features.
Step 1 – Define your target residual oxygen level
Use a portable O₂ analyser on your current packaged products. If you are starting from scratch, refer to published data from your industry association or academic journals (e.g., Journal of Food Engineering). For dried foods, 2–5% residual O₂ is often enough; for cooked meats, <1% may be required.
Step 2 – Calculate the pump capacity needed
Vacuum pump displacement (m³/h) and ultimate pressure determine how quickly and how deeply your machine can pull. A common mistake is buying a pump that is too large (wasted energy, noisy) or too small (unacceptably long cycles). A reliable supplier can run a simple formula: chamber volume × 10–20 exchanges per minute.
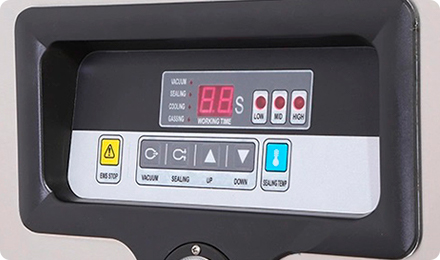
Step 3 – Choose the control type
-
Single-stage (fixed level): Lowest cost, suitable for non‑critical applications.
-
Programmable (multi‑stage): Allows you to set different vacuum levels and hold times. Perfect for mixed production lines.
-
Sensor‑controlled: Automatically stops when a pre‑set vacuum degree is reached. This is the gold standard for consistency.
Step 4 – Test with your actual packaging material
Some films become brittle under deep vacuum and may crack during heat sealing. Request a material test from your equipment provider before committing.
4. Common Misconceptions That Waste Money
-
“My product needs the highest vacuum degree sold on any machine.”
In most cases, a standard industrial chamber unit already exceeds food safety requirements. Extending pumping time from 20 to 40 seconds to reach 0.5 mbar rarely improves shelf life measurably. -
“More vacuum cycles per minute = better efficiency.”
Not if you have to wait extra seconds for a deep vacuum each cycle. Sometimes a slightly shallower vacuum (e.g., 10 mbar) with a larger pump displacement yields higher throughput. -
“All sensors measure the same way.”
Capacitance gauges and Pirani gauges have different accuracy ranges. If you need precise control below 1 mbar, ask for a calibrated absolute pressure transducer.
5. How to Verify a Machine’s Claimed Vacuum Performance
Before you finalise your purchase, perform three simple checks:
-
Leak rate test – After the machine reaches its ultimate pressure, turn off the pump and observe the pressure rise over 1 minute. A good industrial sealer should have a leak rate below 0.1 mbar/s.
-
Repeatability – Run five cycles with the same settings and measure the final pressure each time. Variation should be less than ±5%.
-
Seal integrity under vacuum – Pack a small amount of water (simulating moisture) and see if any liquid is pulled into the seal zone.
These checks are easy to perform on a demo unit, and they reveal more about real‑world quality than any datasheet.
6. When to Move from General to Application‑Specific Equipment
If your production volume exceeds 100 packs per day, or you handle multiple product families (wet/dry, solid/powder), a basic single‑chamber machine may no longer be cost‑effective. Upgrading to a programmable device with adjustable vacuum profiles can reduce waste and energy use by 15–25% according to internal audits from medium‑sized food processors.
At this stage, you also need to consider maintenance access, spare parts availability, and manufacturer support. A machine that runs reliably for eight hours a day with a simple vacuum setting is often a smarter buy than a complex unit with features you never use.
Ready to Find the Right Vacuum Packing Setup for Your Line?
You have learned how vacuum depth is measured, why deeper isn't always better, and how to test a machine before buying. The next logical step is to compare specific models that match your required vacuum range, chamber size, and throughput.
If you want to skip the guesswork and get a professional recommendation based on your product type, daily volume, and budget, you can explore application‑matched industrial vacuum packing solutions here. The team provides free cycle‑time calculations and can arrange sample testing with your actual packaging material.
Notes & References
-
ISO 21358-1:2018 – Leak detection methods for vacuum equipment.
-
Data on residual oxygen vs. shelf life: Food Packaging Technology Handbook, CRC Press, 2021.
-
Pump sizing formulas based on common engineering practices in the packaging industry.